How to add Google Analytics to your website or blog
Remember, without measurement, there is no success. You have to measure and track whatever you are doing to know how much progress you are making.
Without a goal, there is no where to go, no finish line, no end, and without benchmarks you have no idea where you are, or where the starting line is. So, let’s see where we are in terms of traffic to our websites and blogs and then set some goals so that we can start our journey to accomplish them.

Below is a step by step process for putting a Google Analytics tracking code on your site or blog. If you don’t have a website or blog, then this post is probably not for you, but it you are interested in learning more about how to track visits to your site or blog, for free and with less than 15 minutes of set up time, please follow the instructions below.
- If you don’t have a blog, set one up at http://www.blogger.com
You may need to create a Google Account to do this. - Once you have set up your blog. Create a few posts or entries about something you are interested in.
- View your blog and copy the URL (from the address bar) of your blog

- Open a new tab or window and go to http://analytics.google.com and press the blue “Access Analytics” button
- Once you are logged in, look for the “Add Website Profile” link

2011-11-11 Update: If you don’t see the Add Website Profile link, look on the right hand side of the screen for “My Analytics Accounts: Select an account” and a drop down menu. Select “Create New Account” at the bottom of the drop down menu.
- Click the Sign Up >> button
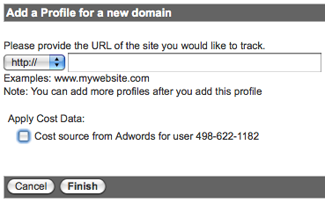
- Paste your URL into the Add a Profile for a new domain field. It is important that you paste YOUR URL, i.e. only a website address or blog address that you have control of. You can NOT track a website or blog that you do not control. You may only track your own sites and blog.

- Click the Continue >> button
- Enter your Last Name and First Name and select your country, then click the Continue >> button
- Agree to the terms and conditions by checking the box and then click the Create New Account >> button
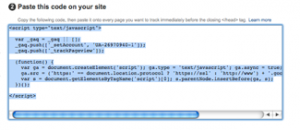
- Copy the script code on the following screen where you see “2. Paste this code onto your site.”
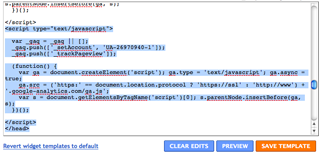
- In blogger, go back to your blog and get to the dashboard, i.e. click new post or edit posts. In your website, you will be copying the script into each page, just before the closing </head> tag. If you have a website set up with a template, you may only need to do this once in a footer file. (If you are not using Blogger, skip to step 15.)
- In Blogger, click on the Design tab, and then
- Click on the Edit HTML link
- Do a find [on a Windows machine, hold down the Ctrl + F keys at the same time, on a Mac hold down Command +F] for </head> in the HTML code page. Add a line break before you paste so that it works well.
- Save the template and/or your work if you are not in blogger.
- Go back to Google Analytics, which you still have open in another window or tab, and click “Save and Finish”
 You will see a yellow triangle with an exclamation point in it. IMPORTANT: It takes 24 hours for the tracking to start happening. If everything is working correctly, in an hour or two, you should see a clock symbol, meaning that Google is “waiting for data.” Check back in 24 hours to make sure the tracking is working and ask your friends to visit your site or blog so that you can see some activity. When everything is working correctly, you’ll see a green checkmark next to the site when you next log into Google Analytics.
If you have any questions about any of the above steps, please leave a comment. Happy tracking!


Pingback: How to add Google Analytics to your website or blog Scripts Rss
Pingback: How to add Google Analytics to your website or blog Scripts Rss
Excellent post, some great resources. You really did note down every little detail, got some changing to do!